EX.NO:1 Establishing
a Local Area Network
AIM
Objectives
To establish a local Area Network consisting of three
personal computers running the Linux operating system, and a hub.
Physically connect computers
Configure IP addresses using ifconfig
Manipulate routing table using route
Background Reading
Knowledge of network addressing standards and Linux system
administration relating to Local Area Networks is necessary for this lab.
Online Linux documentation can be found at www.tldp.org
. Specifically, read the man pages on ifconfig, route , traceroute and chkconfig.
Required Equipment
Three PCs (with Linux OS)
PC’s should be equipped with Network Interface Cards
One hub/switch
Cables
Exercises
Students will perform
the following tasks and explain:
How they did them.
Why they were/weren’t
successful.
What they observed.
____ Setup a
physical LAN
First, determine which cables are necessary for the
available hardware
Insert one end of the cable into the Hub/Switch and the
other end of the cable into the host computer.
Connect all host computers to the Hub/Switch as in the
figure below
192.168.1.1 192.168.1.2 192.168.1.3
 |
 |
|

3
- To start the process of setting up a printer,
- click System > Administration > Printing to bring up the Printer administration tool (see Figure 1).
- From this window you need to click the Add button and select "Printer".
- You will have to enter your root password to continue.
- Depending upon the state of your firewall, this might open up a window informing you that changes must be made to your firewall to allow the detection of a network printer.
- Allow this to happen by clicking Adjust Firewall.
- You will then be asked for your root password once again.
- The next window to appear is the New Printer window.
- Here you will expand the Network Printer selection (see Figure 2) and then select Find Network Printer.
- When you click that button you will need to enter the IP address of your printer server and then click the Find button.
- Once you have done that the tool will automatically add the necessary information for the printer location
- Click the Verify button to make sure the printer information is correct. In my case I had to replace the host name with the IP address.
- I could have gotten around this by mapping the hostname to an IP address in the /etc/hosts file.
- Once you have done this, click the Forward button and the drivers will automatically be detected and installed (if necessary).
- If your drivers must be installed, click the Install button (when prompted). The drivers will then be attached to the printer and you will be moved to another screen - printer description.
- The information in this window is all user-friendly, user-readable information.
- After you fill this out, click Apply, enter your root password, and click Print Test Page when prompted.
- That's it. You have successfully set up a networked printer in Linux.
|
yum -y install glibc* libstd* ld-linux.so.2
|
|
tar zxvf xampp-linux-1.8.1.tar.gz
|
|
mv ./lampp /opt/
|
|
# XAMPP is currently 32 bit only
#<span class="adtext"
id="adtext_8">case</span> `uname -m` in
# *_64)
# if /opt/lampp/bin/php -v >
/dev/null 2>&1
# then
# :
# else
# $de &&
echo "XAMPP gibt es zur Zeit nur als 32-Bit Applikation.
# Bitte verwende eine
32-Bit Kompatibilitaetsbibliothek fuer Dein
# System."
#
# $de || echo
"XAMPP is currently only availably as 32 bit
# application. Please
use a 32 bit compatibility library for
# your system."
#
# exit
# fi
# ;;
#esac
|
|
<LocationMatch "^/(?i:(?:xampp|<span
class="adtext"
id="adtext_6">security</span>|licenses|phpmyadmin|webalizer|
server-status|server-info))">
Order deny, allow
# Deny from all
Require all granted
# Allow from ::1 127.0.0.0/8 \
# fc00::/7 10.0.0.0/8
172.16.0.0/12 192.168.0.0/16
# fe80::/10
169.254.0.0/16
ErrorDocument 403
/error/XAMPP_FORBIDDEN.html.var
</LocationMatch>
|
|
/opt/lampp/lampp start
|
|
$cfg['DefaultLang'] = 'en-utf-8'; // Language if no
other language is recognized
$cfg['Lang'] =
'en-utf-8'; // Force this language
for all users
|
|
$cfg['Servers'][$i]['auth_type'] = 'cookie'
|
|
$cfg['Servers'][$i]['table_uiprefs'] =
'pma_table_uiprefs';
$cfg['Servers'][$i]['recent'] = 'pma_recent';
|
|
/opt/lampp/lampp restart
|
Upload Via Web Control Panel
<body>
<form action="welcome.php" method="post">
Name: <input type="text" name="name"><br>
E-mail: <input type="text" name="email"><br>
<input type="submit">
</form>
</body>
</html>
<body>
Welcome <?php echo $_POST["name"]; ?><br>
Your email address is: <?php echo $_POST["email"]; ?>
</body>
</html>
Name:
E-mail:
Your email address is: itaksoft@gmail.com
if ($value>=80)
{
echo " Distinction :$value ";
}
elseif ($value>=60&&$value<80)
{
echo " First Class :$value";
}
elseif ($value>=45&&$value<60)
{
echo " Pass Class :$value";
}
?>
Distinction :82
fail:23
pass Class:37
Second Class:57
Distinction :97
- Write a program to show that array is received on server side during multiple options in SELECT
<body>
<form name="f1" action="select.php" method="post" >
<select name="game[]" multiple="multiple" size="2">
<option value="cricket">cricket
<option value="football">football
<option value="basket">baseketball
<option value="rubby">rubby
</select>
<input type=submit value="send">
</form>
</body>
</html>
<html>
<head>
</head>
<body>
<?php
// define variables and set to empty values
$name = $email = $gender = $comment = $website = "";
if ($_SERVER["REQUEST_METHOD"] == "POST")
{
$name = test_input($_POST["name"]);
$email = test_input($_POST["email"]);
$website = test_input($_POST["website"]);
$comment = test_input($_POST["comment"]);
$gender = test_input($_POST["gender"]);
}
function test_input($data)
{
$data = trim($data);
$data = stripslashes($data);
$data = htmlspecialchars($data);
return $data;
}
?>
<h2>PHP Form Validation Example</h2>
<form method="post" action="<?php echo htmlspecialchars($_SERVER["PHP_SELF"]);?>">
Name: <input type="text" name="name">
<br><br>
E-mail: <input type="text" name="email">
<br><br>
Website: <input type="text" name="website">
<br><br>
Comment: <textarea name="comment" rows="5" cols="40"></textarea>
<br><br>
Gender:
<input type="radio" name="gender" value="female">Female
<input type="radio" name="gender" value="male">Male
<br><br>
<input type="submit" name="submit" value="Submit">
</form>
<?php
echo "<h2>Your Input:</h2>";
echo $name;
echo "<br>";
echo $email;
echo "<br>";
echo $website;
echo "<br>";
echo $comment;
echo "<br>";
echo $gender;
?>
</body>
</html>
// Redirect the browser to http://www.switchplane.com/websites/
header("location: http://www.switchplane.com/websites/");
?>
// Send the "301 Moved Permanently" status code first.
header("HTTP/1.1 301 Moved Permanently");
// Redirect the browser to http://www.switchplane.com/websites/
header("location: http://www.switchplane.com/websites/");
// You can optionally tell PHP to exit at this point.
// You might need to do this if you're not sure whether any
// other output may be produced by your PHP environment.
exit();
?>
function sum($x,$y)
{
$z=$x+$y;
return $z;
}
echo "5 + 10 = " . sum(5,10) . "<br>";
echo "7 + 13 = " . sum(7,13) . "<br>";
echo "2 + 4 = " . sum(2,4);
?>
$string = '<?php $dbhost = "'. $_POST["dbhost"]. '";$dbuname = "'. $_POST["dbuname"]. '";$dbpass = "'. $_POST["dbpass"]. '";$dbname = "'. $_POST["dbname"]. '";$prefix = "'. $_POST["prefix"]. '";$user_prefix = "'. $_POST["user_prefix"]. '";$dbtype = "'. $_POST["dbtype"]. '";?>';$fp = fopen("config.php", "w");fwrite($fp, $string);fclose($fp);?>$con=mysqli_connect("example.com","peter","abc123");
// Check connection
if (mysqli_connect_errno())
{
echo "Failed to connect to MySQL: " . mysqli_connect_error();
}
// Create database
$sql="CREATE DATABASE my_db";
if (mysqli_query($con,$sql))
{
echo "Database my_db created successfully";
}
else
{
echo "Error creating database: " . mysqli_error($con);
}
?>
<body>
<form action="insert.php" method="post">
Firstname: <input type="text" name="firstname">
Lastname: <input type="text" name="lastname">
Age: <input type="text" name="age">
<input type="submit">
</form>
</body>
</html>
$con=mysqli_connect("example.com","peter","abc123","my_db");
// Check connection
if (mysqli_connect_errno())
{
echo "Failed to connect to MySQL: " . mysqli_connect_error();
}
$sql="INSERT INTO Persons (FirstName, LastName, Age)
VALUES
('$_POST[firstname]','$_POST[lastname]','$_POST[age]')";
if (!mysqli_query($con,$sql))
{
die('Error: ' . mysqli_error($con));
}
echo "1 record added";
mysqli_close($con);
?>
$con=mysqli_connect("example.com","peter","abc123","my_db");
// Check connection
if (mysqli_connect_errno())
{
echo "Failed to connect to MySQL: " . mysqli_connect_error();
}
$result = mysqli_query($con,"SELECT * FROM Persons");
echo "<table border='1'>
<tr>
<th>Firstname</th>
<th>Lastname</th>
</tr>";
while($row = mysqli_fetch_array($result))
{
echo "<tr>";
echo "<td>" . $row['FirstName'] . "</td>";
echo "<td>" . $row['LastName'] . "</td>";
echo "</tr>";
}
echo "</table>";
mysqli_close($con);
?>
$con=mysqli_connect("example.com","peter","abc123","my_db");
// Check connection
if (mysqli_connect_errno())
{
echo "Failed to connect to MySQL: " . mysqli_connect_error();
}
mysqli_query($con,"UPDATE Persons SET Age=36
WHERE FirstName='Peter' AND LastName='Griffin'");
mysqli_close($con);
?>
$con=mysqli_connect("example.com","peter","abc123","my_db");
// Check connection
if (mysqli_connect_errno())
{
echo "Failed to connect to MySQL: " . mysqli_connect_error();
}
mysqli_query($con,"DELETE FROM Persons WHERE LastName='Griffin'");
mysqli_close($con);
?>
import re;
mobile = input("Enter the mobile Number:")
p = r EX.NO:1 Establishing
a Local Area Network
|
|
|
3
- To start the process of setting up a printer,
- click System > Administration > Printing to bring up the Printer administration tool (see Figure 1).
- From this window you need to click the Add button and select "Printer".
- You will have to enter your root password to continue.
- Depending upon the state of your firewall, this might open up a window informing you that changes must be made to your firewall to allow the detection of a network printer.
- Allow this to happen by clicking Adjust Firewall.
- You will then be asked for your root password once again.
- The next window to appear is the New Printer window.
- Here you will expand the Network Printer selection (see Figure 2) and then select Find Network Printer.
- When you click that button you will need to enter the IP address of your printer server and then click the Find button.
- Once you have done that the tool will automatically add the necessary information for the printer location
- Click the Verify button to make sure the printer information is correct. In my case I had to replace the host name with the IP address.
- I could have gotten around this by mapping the hostname to an IP address in the /etc/hosts file.
- Once you have done this, click the Forward button and the drivers will automatically be detected and installed (if necessary).
- If your drivers must be installed, click the Install button (when prompted). The drivers will then be attached to the printer and you will be moved to another screen - printer description.
- The information in this window is all user-friendly, user-readable information.
- After you fill this out, click Apply, enter your root password, and click Print Test Page when prompted.
- That's it. You have successfully set up a networked printer in Linux.
|
yum -y install glibc* libstd* ld-linux.so.2
|
|
tar zxvf xampp-linux-1.8.1.tar.gz
|
|
mv ./lampp /opt/
|
|
# XAMPP is currently 32 bit only
#<span class="adtext"
id="adtext_8">case</span> `uname -m` in
# *_64)
# if /opt/lampp/bin/php -v >
/dev/null 2>&1
# then
# :
# else
# $de &&
echo "XAMPP gibt es zur Zeit nur als 32-Bit Applikation.
# Bitte verwende eine
32-Bit Kompatibilitaetsbibliothek fuer Dein
# System."
#
# $de || echo
"XAMPP is currently only availably as 32 bit
# application. Please
use a 32 bit compatibility library for
# your system."
#
# exit
# fi
# ;;
#esac
|
|
<LocationMatch "^/(?i:(?:xampp|<span
class="adtext"
id="adtext_6">security</span>|licenses|phpmyadmin|webalizer|
server-status|server-info))">
Order deny, allow
# Deny from all
Require all granted
# Allow from ::1 127.0.0.0/8 \
# fc00::/7 10.0.0.0/8
172.16.0.0/12 192.168.0.0/16
# fe80::/10
169.254.0.0/16
ErrorDocument 403
/error/XAMPP_FORBIDDEN.html.var
</LocationMatch>
|
|
/opt/lampp/lampp start
|
|
$cfg['DefaultLang'] = 'en-utf-8'; // Language if no
other language is recognized
$cfg['Lang'] =
'en-utf-8'; // Force this language
for all users
|
|
$cfg['Servers'][$i]['auth_type'] = 'cookie'
|
|
$cfg['Servers'][$i]['table_uiprefs'] =
'pma_table_uiprefs';
$cfg['Servers'][$i]['recent'] = 'pma_recent';
|
|
/opt/lampp/lampp restart
|
Upload Via Web Control Panel
<body>
<form action="welcome.php" method="post">
Name: <input type="text" name="name"><br>
E-mail: <input type="text" name="email"><br>
<input type="submit">
</form>
</body>
</html>
<body>
Welcome <?php echo $_POST["name"]; ?><br>
Your email address is: <?php echo $_POST["email"]; ?>
</body>
</html>
Name:
E-mail:
Your email address is: itaksoft@gmail.com
if ($value>=80)
{
echo " Distinction :$value ";
}
elseif ($value>=60&&$value<80)
{
echo " First Class :$value";
}
elseif ($value>=45&&$value<60)
{
echo " Pass Class :$value";
}
?>
Distinction :82
fail:23
pass Class:37
Second Class:57
Distinction :97
- Write a program to show that array is received on server side during multiple options in SELECT
<body>
<form name="f1" action="select.php" method="post" >
<select name="game[]" multiple="multiple" size="2">
<option value="cricket">cricket
<option value="football">football
<option value="basket">baseketball
<option value="rubby">rubby
</select>
<input type=submit value="send">
</form>
</body>
</html>
<html>
<head>
</head>
<body>
<?php
// define variables and set to empty values
$name = $email = $gender = $comment = $website = "";
if ($_SERVER["REQUEST_METHOD"] == "POST")
{
$name = test_input($_POST["name"]);
$email = test_input($_POST["email"]);
$website = test_input($_POST["website"]);
$comment = test_input($_POST["comment"]);
$gender = test_input($_POST["gender"]);
}
function test_input($data)
{
$data = trim($data);
$data = stripslashes($data);
$data = htmlspecialchars($data);
return $data;
}
?>
<h2>PHP Form Validation Example</h2>
<form method="post" action="<?php echo htmlspecialchars($_SERVER["PHP_SELF"]);?>">
Name: <input type="text" name="name">
<br><br>
E-mail: <input type="text" name="email">
<br><br>
Website: <input type="text" name="website">
<br><br>
Comment: <textarea name="comment" rows="5" cols="40"></textarea>
<br><br>
Gender:
<input type="radio" name="gender" value="female">Female
<input type="radio" name="gender" value="male">Male
<br><br>
<input type="submit" name="submit" value="Submit">
</form>
<?php
echo "<h2>Your Input:</h2>";
echo $name;
echo "<br>";
echo $email;
echo "<br>";
echo $website;
echo "<br>";
echo $comment;
echo "<br>";
echo $gender;
?>
</body>
</html>
// Redirect the browser to http://www.switchplane.com/websites/
header("location: http://www.switchplane.com/websites/");
?>
// Send the "301 Moved Permanently" status code first.
header("HTTP/1.1 301 Moved Permanently");
// Redirect the browser to http://www.switchplane.com/websites/
header("location: http://www.switchplane.com/websites/");
// You can optionally tell PHP to exit at this point.
// You might need to do this if you're not sure whether any
// other output may be produced by your PHP environment.
exit();
?>
function sum($x,$y)
{
$z=$x+$y;
return $z;
}
echo "5 + 10 = " . sum(5,10) . "<br>";
echo "7 + 13 = " . sum(7,13) . "<br>";
echo "2 + 4 = " . sum(2,4);
?>
$string = '<?php $dbhost = "'. $_POST["dbhost"]. '";$dbuname = "'. $_POST["dbuname"]. '";$dbpass = "'. $_POST["dbpass"]. '";$dbname = "'. $_POST["dbname"]. '";$prefix = "'. $_POST["prefix"]. '";$user_prefix = "'. $_POST["user_prefix"]. '";$dbtype = "'. $_POST["dbtype"]. '";?>';$fp = fopen("config.php", "w");fwrite($fp, $string);fclose($fp);?>$con=mysqli_connect("example.com","peter","abc123");
// Check connection
if (mysqli_connect_errno())
{
echo "Failed to connect to MySQL: " . mysqli_connect_error();
}
// Create database
$sql="CREATE DATABASE my_db";
if (mysqli_query($con,$sql))
{
echo "Database my_db created successfully";
}
else
{
echo "Error creating database: " . mysqli_error($con);
}
?>
<body>
<form action="insert.php" method="post">
Firstname: <input type="text" name="firstname">
Lastname: <input type="text" name="lastname">
Age: <input type="text" name="age">
<input type="submit">
</form>
</body>
</html>
$con=mysqli_connect("example.com","peter","abc123","my_db");
// Check connection
if (mysqli_connect_errno())
{
echo "Failed to connect to MySQL: " . mysqli_connect_error();
}
$sql="INSERT INTO Persons (FirstName, LastName, Age)
VALUES
('$_POST[firstname]','$_POST[lastname]','$_POST[age]')";
if (!mysqli_query($con,$sql))
{
die('Error: ' . mysqli_error($con));
}
echo "1 record added";
mysqli_close($con);
?>
$con=mysqli_connect("example.com","peter","abc123","my_db");
// Check connection
if (mysqli_connect_errno())
{
echo "Failed to connect to MySQL: " . mysqli_connect_error();
}
$result = mysqli_query($con,"SELECT * FROM Persons");
echo "<table border='1'>
<tr>
<th>Firstname</th>
<th>Lastname</th>
</tr>";
while($row = mysqli_fetch_array($result))
{
echo "<tr>";
echo "<td>" . $row['FirstName'] . "</td>";
echo "<td>" . $row['LastName'] . "</td>";
echo "</tr>";
}
echo "</table>";
mysqli_close($con);
?>
$con=mysqli_connect("example.com","peter","abc123","my_db");
// Check connection
if (mysqli_connect_errno())
{
echo "Failed to connect to MySQL: " . mysqli_connect_error();
}
mysqli_query($con,"UPDATE Persons SET Age=36
WHERE FirstName='Peter' AND LastName='Griffin'");
mysqli_close($con);
?>
$con=mysqli_connect("example.com","peter","abc123","my_db");
// Check connection
if (mysqli_connect_errno())
{
echo "Failed to connect to MySQL: " . mysqli_connect_error();
}
mysqli_query($con,"DELETE FROM Persons WHERE LastName='Griffin'");
mysqli_close($con);
?>
import re;
mobile = input("Enter the mobile Number:")
p = re.compile('(^[+0-9]{1,3})*([0-9]{10,11}$)')
if p.match(mobile)!= None :
print("Given Mobile Number is Valid")
else:
print("Given Mobile Number is not Valid")
e.compile('(^[+0-9]{1,3})*([0-9]{10,11}$)')
if p.match(mobile)!= None :
print("Given Mobile Number is Valid")
else:
print("Given Mobile Number is not Valid")
………………………………………………………………………………………………
____ Host set-up (e.g.
IP address and netmask) using ifconfig
a. ifconfig
command usage for this part of the lab will be to configure network interface
devices. This includes adding the IP
address and the netmask for the host.
b. Boot each
host machine and log on with your user-name.
c. Open a new
terminal on each host and log on as root.
$ su -
# password
d. Check
network interface settings using ifconfig
# ifconfig –a
e. Verify that
eth0 exists on each host by checking the output from above
f. Set the ethernet
interface at each host using ifconfig
This will assign an ip address and network mask to the host.
The following is a sample.
For host 1: # ifconfig eth0 192.168.1.1 netmask 255.255.255.0
g. Verify
communication among the machines by using the ping command.
On host 1 ping the
other two hosts.
# ping 192.168.1.2
--------output------
# ping 192.168.1.3
--------output------
On
host A run traceroute to the other
hosts
#traceroute
192.168.1.2
---------output---------
#traceroute
192.168.1.3
---------output---------
h. Changes
using ifconfig at this point are not
permanent and will be lost on reboot. To
make the configuration effective on reboot you need to edit the file
/etc/sysconfig/networks-scripts/ifcfg-eth0 to have the following settings.
# contents of ifcfg-eth0
DEVICE = eth0
BROADCAST = 192.168.1.255
IPADDR = 192.168.1.1
NETMASK = 255.255.255.0
NETWORK = 192.168.1.0
ONBOOT = yes
BOOTPROTO = none
i. Check that
the network script has been added to the default init levels.
# chkconfig --list
j. If the
network script is not on add it using chkconfig. This command adds the network script to the
current run level.
# chkconfig --add network
____ Manipulate
routing tables using route
a. The route command is used to look at the hosts routing
table and can be used to add or delete routes from the table. It has the following syntax:
route add|del –net|-host
target [gateway] [metric] [device]
route manipulates the kernel's IP
routing table. Its primary use is to set up static routes to specific hosts or
networks via an interface after it has been configured with the ifconfig
command. The command route with no arguments displays the
routing table.
b. After the
steps from part 2 the route to the network 192.168.1.0 will be in the routing
table. Verify the network is in the
routing table using the route
command.
# route
---output---
To illustrate the use and functionality of the command
route, we will delete an entry and add an entry to the table. Delete the
network 192.168.1.0 using the route
command.
# route del –net 192.168.1.0 netmask 255.255.255.0
Check the routing table and verify that the network has been
removed from the routing table.
# route
Verify the deleted network is no longer reachable.
# ping 192.168.1.3
Add individual hosts to the routing table to allow
communication.
# route add –host 192.168.1.2 dev eth0
# route add –host 192.168.1.3 dev eth0
Verify these hosts are in the routing table.
# route
Use the ping
command to verify communication among the machines has been restored.
# ping 192.168.1.2
# ping 192.168.1.3
Notice the machines were reachable when either the network
or the individual host was in the routing table. Note also that the exercise manipulating the
routing table was unnecessary since the ifconfig
command places the network in the routing table for us.
EX.NO:2A Connect Internet in Linux Environment
AIM:
Connect Internet in Linux Environment
Configuring networks such as a Digital Subscriber Line (DSL)
or Asynchronous Digital Subscriber Line (ADSL) primarily used for accessing the
internet can be a hassle, especially when you aren't using the same operating
system as what the directions were originally written for. This article is a
starting point for configuring DSL using Ubuntu Linux.
Steps

1
Open Network Connections to set up network settings in
Ubuntu. Go to “System”,
“Preferences” and chose “Network Connections."

2
Under the “Wired” tab, click on
“Auto eth0” and select “Edit."
Click on “IPV4 Settings” tab. Chose the “Automatic (DHCP)” option if
your network has a DHCP server. The DHCP Server has automatically assigned the
IP address to your system. Click "Apply."
You also chose the “Manual” option
from the Method drop-down list and assign the IP address, netmask and gateway
manually. You'll also have to assign the DNS Server address. Click
"Apply."


4
Check the IP address settings. Go to “Applications” “Accessories” and
chose “Terminal."

5
Type the following command into
terminal: “sudo ifconfig” without
quotes.

6
Get your new addresses. The Ifconfig command will show the
inet address, broadcast address and mask address.
EX.NO:2B
Setting up a Print Server in Linux Environment
AIM
Setting up a Print
Server in Linux Environment
Setting
up a network printer in Fedora
starting the process
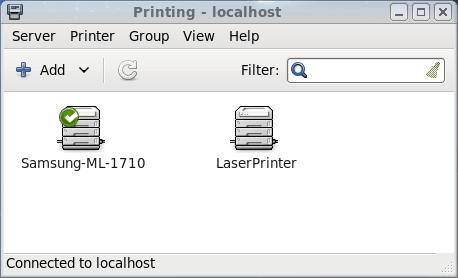
Figure 1

Figure 2

Figure 3).
EX.NO:3A
AIM
Installation
of Apache Web server and configuring for PHP support.
The installation procedure here
is based on CentOS 6.x workstation default installation. This distro
and installation lack many of the libraries you need so it requires more work
to get XAMPP running than on other distros like Ubuntu.
1. The
default installation of CentOS lacks some of the libraries that XAMPP needs to
run, including 32 bit compatibility libraries. To get them you su to root
then use this yum command
2. Download
and install the latest verions from the XAMPP – 1.8.1 as of this writing – from
the XAMPP download page.
3.
Unpack the tarball.
4.
Move the xampp package to /opt
5. XAMPP
was designed to run on 32 bit operating systems. The start up script will
prevent xampp from starting up if you are running on a 64 bit system which
isn’t necessary since you installed 32 bit compatibility libraries in step 1.
To get around this restriction, open /opt/lampp/lampp in an editor and comment
out the following lines.
7.
Open /opt/lampp/etc/etc/extra/httpd-xampp.conf
in an editor.
8. Replace
the “Deny from all” statement with “Require all grant” in the
<LocationMatch> stanza. You can also comment out the “Allow from…”
line if you don’t want to accept connections from any external system.
9.
Start up xampp
10. Open
http://localhost in a browser. You should a get a browser window with
the XAMPP for Linux startup screen:

11. At
this point most of the setup work for XAMPP is done. However, if you plan
to use phpyMyAdmin you’ll have to do a little further configuration to get it
to work properly.
12. XAMPP
does not create all the tables that phpmyadmin needs so you have to do this
with an SQL script that is enclosed with the package. To do this click on
the Import tab in the toobar at the top of the screen.
13. Click
on the Choose button in the File to import section. The
button in your version of phpMyAdmin might say Browse.

14. Choose
the create_tables.sql script in /opt/lampp/lampp/phpmyadmin/examples
directory.

15. Click
on the Go button in the Format of imported file to run the
script which will add all the tables you need to the phpmyadmin database.
16. Open
/opt/lampp/lampp/phpmyadmin/config.inc.php in your editor of choice.
17. If
you want the default language of phpMyAdmin to be English, add these two lines:
18. Change
the authentication type as follows:
19. Add
the following lines in the config.inc.php file.
20. To
set a root password for phpmyadmin click on the Users tab in the
XAMPP Control Panel toolbar.

21. Click
on the edit icon in the column to the right on the User
Overview table for the root account on localhost.

22. Click
on the Password radio button in the Change password section
of the Edit Privileges: User ‘root’@'localhost’ page.

23. Enter
the new password then re-type the password.
24. Click
on the Go button to save the new password.
25. Repeat
steps 21 – 24 for root account on linux.
26. Close
your browser then restart Apache and MySQL in the XAMPP Control Panel.
27. Open
phpMyAdmin in your browser. This time you’ll be take to a phpMyAdmin
login screen.
28. Login
as root using password you set in step 21.
If
everything went well you’ll go to the phpMyAdmin main screen and see
a green Exit icon under the phpMyAdmin frame on the left side of
the screen. You can now create other databases and tables with phpMyAdmin
EX.NO:3 B UPLOADINGWEB
PAGE IN APACHE
You
can upload files to an Apache Web
server in two different ways:
via a standalone File
Transfer Protocolapplication or a Web-based control panel. Standalone FTP applications
act as independent bridges connecting your computer and your Web server over an
Internet connection. Launch them like you would any other application in your
Windows programs directory. Web-based control panels provide a similar service,
except you access them through your Web browser
Step 1
Open your computer’s FTP application.
Certain versions of windows come bundled with an application called WS_FTP
designed for this purpose. If you don’t already have an FTP application, download
one. FileZilla is a free alternative to WS_FTP.
Step 2
Create a new connection in your FTP
application and log in to your Apache server. What’s involved in creating a new
connection varies depending on the FTP software you’re using. In FileZilla,
open the Site Manager tool and click “New Site.” Enter your website’s Web
address in the “Host” field. Enter your username and password. Click the
“Connect” button when you’re finished.
Step 3
Navigate to
the desired directory on your Apache server. In most FTP applications, your
screen will be divided into two primary windows: one on the left showing files
on your computer and another on the right showing files on your Web server. If you’re uploading files that you want to be visible to the public,
look for a directory with a name like “Web,” “Public” or “public_html” in the
window on the right side of your FTP application.
Step 4
Locate the files you would like to upload
from your computer to your Web server. Double-click them in the left window to
add them to your uploads queue. In FileZilla, the uploads queue is on the
bottom of your screen. Each double-clicked file will appear in the queue. When
the queue is empty again, your uploads are complete.
Step 1
Open your
Web browser and navigate to your Web server’s control panel. The Web address of
your control panel varies depending on your Web host. On Apache servers running cPanel, for example, your address will usually
be www.yoursite.com/cpanel. Contact your Web host for the location of your
control panel.
Step 2
Log in to your control panel and navigate
to your file upload area. How this area is labeled depends on your Web host.
Common labels include “FTP” and “Upload Files.” On servers running cPanel, the
file upload area is usually called “File Manager.”
Step 3
Navigate to the Web server folder where
you want to upload your files.
Step 4
Click the “Upload” button and select the
files on your computer you’d like to upload. In cPanel, you’ll need to click a
“Browse” button in File Manager to display files on your computer. Double-click
files to add them to your queue. They will begin uploading automatically.
PHP and MYSQL
EX.NO:4
AIM:
Create a web page and execute a PHP file on submission of
the HTML form and display
the information using PHP.
<html>
<html>
Output:
Welcome boopathi
5 a. Write a program to find the factorial of a
number and display.
<?php
function factorial($number) {
if ($number < 2) {
return 1;
} else {
return ($number * factorial($number-1));
}
}
Print factorial(5);
?>
b. Generate a PHP script that will display the grade
on the basis of marks as follows :
Distinction – 80 and
above
First Class – From 60
to below 80
Second Class – From
45 to below 60
Pass Class – From 35 to below 45
Fail – Below 35
Test the above program using the following set of values
stored in an array : 67,82, 23,
37, 57, and 97
Program
<?php
$mark = array(67,82, 23,37, 57, 97);
foreach ($mark as $value)
{
echo “Second Class:$value”;
}
elseif ($value>=35&&$value<45)
{
else
{
echo “fail:$value”;
}
}
Output:
First Class :67
select.php
<?php
foreach($_POST['game'] as $value)
{
echo 'Selected: ',$value ;
echo"<br>" ;
}
?>
select.html
7. Create a PHP code, which will retrieve the data captured
by the HTML form, display the
name of the form and also display the message “Data Entered
successfully” after
performing validations.
<!DOCTYPE HTML>
Echo “Data Entered successfully ”;
8. Write a program to redirect the browser.
<?php
<?php
9. Write a PHP script using function call.
<?php
Output:
10 Write a program in PHP to create a file and write the
data into it.
<?php
11 Create a database of an employee in MySql.
<?php
12 Write a program to connect to the database already
created inMySql.
<?php
$con =
mysql_connect("localhost","root","");
if (!$con)
{
die('Could not
connect: ' . mysql_error());
}
else
{
echo "ok data
base";
}
mysql_select_db("emp", $con);
$sql = "CREATE TABLE Per
(
FirstName varchar(15),
LastName varchar(15),
Age int
)";
echo "table create";
// Execute query
mysql_query($sql,$con);
mysql_close($con);
?>
13 Write a program to read, write, update and delete the
database using PHP..
Insert Data From a Form Into a Database
<html>
<?php
Display the Result in an HTML Table
<?php
Update Data In a Database
<?php
Delete Data In a Database
<?php
PYTHON
14 a. Take Fahrenheit temperatures from the command line,
and prints their Celsius
Equivalents
print ("Select conversion:")
print
("1. C to F")
print ("2. F
to C")
option =
input(">")
if option == 1:
celsius =
input("Enter temperature in Celsius: ")
fahrenheit =
celsius * 1.8 + 32
print
"The temperature in Fahrenheit is " + str(fahrenheit)
elif option == 2:
fahrenheit =
input("Enter temperature in Fahrenheit: ")
celsius =
(fahrenheit * 5 - 160) / 9
print
"The temperature in Celsius is " + str(celsius)
b. Use regular expressions to check whether a phone number
is valid
AIM
Objectives
To establish a local Area Network consisting of three
personal computers running the Linux operating system, and a hub.
Physically connect computers
Configure IP addresses using ifconfig
Manipulate routing table using route
Background Reading
Knowledge of network addressing standards and Linux system
administration relating to Local Area Networks is necessary for this lab.
Online Linux documentation can be found at www.tldp.org
. Specifically, read the man pages on ifconfig, route , traceroute and chkconfig.
Required Equipment
Three PCs (with Linux OS)
PC’s should be equipped with Network Interface Cards
One hub/switch
Cables
Exercises
Students will perform
the following tasks and explain:
How they did them.
Why they were/weren’t
successful.
What they observed.
____ Setup a
physical LAN
First, determine which cables are necessary for the
available hardware
Insert one end of the cable into the Hub/Switch and the
other end of the cable into the host computer.
Connect all host computers to the Hub/Switch as in the
figure below
192.168.1.1 192.168.1.2 192.168.1.3
………………………………………………………………………………………………
____ Host set-up (e.g.
IP address and netmask) using ifconfig
a. ifconfig
command usage for this part of the lab will be to configure network interface
devices. This includes adding the IP
address and the netmask for the host.
b. Boot each
host machine and log on with your user-name.
c. Open a new
terminal on each host and log on as root.
$ su -
# password
d. Check
network interface settings using ifconfig
# ifconfig –a
e. Verify that
eth0 exists on each host by checking the output from above
f. Set the ethernet
interface at each host using ifconfig
This will assign an ip address and network mask to the host.
The following is a sample.
For host 1: # ifconfig eth0 192.168.1.1 netmask 255.255.255.0
g. Verify
communication among the machines by using the ping command.
On host 1 ping the
other two hosts.
# ping 192.168.1.2
--------output------
# ping 192.168.1.3
--------output------
On
host A run traceroute to the other
hosts
#traceroute
192.168.1.2
---------output---------
#traceroute
192.168.1.3
---------output---------
h. Changes
using ifconfig at this point are not
permanent and will be lost on reboot. To
make the configuration effective on reboot you need to edit the file
/etc/sysconfig/networks-scripts/ifcfg-eth0 to have the following settings.
# contents of ifcfg-eth0
DEVICE = eth0
BROADCAST = 192.168.1.255
IPADDR = 192.168.1.1
NETMASK = 255.255.255.0
NETWORK = 192.168.1.0
ONBOOT = yes
BOOTPROTO = none
i. Check that
the network script has been added to the default init levels.
# chkconfig --list
j. If the
network script is not on add it using chkconfig. This command adds the network script to the
current run level.
# chkconfig --add network
____ Manipulate
routing tables using route
a. The route command is used to look at the hosts routing
table and can be used to add or delete routes from the table. It has the following syntax:
route add|del –net|-host
target [gateway] [metric] [device]
route manipulates the kernel's IP
routing table. Its primary use is to set up static routes to specific hosts or
networks via an interface after it has been configured with the ifconfig
command. The command route with no arguments displays the
routing table.
b. After the
steps from part 2 the route to the network 192.168.1.0 will be in the routing
table. Verify the network is in the
routing table using the route
command.
# route
---output---
To illustrate the use and functionality of the command
route, we will delete an entry and add an entry to the table. Delete the
network 192.168.1.0 using the route
command.
# route del –net 192.168.1.0 netmask 255.255.255.0
Check the routing table and verify that the network has been
removed from the routing table.
# route
Verify the deleted network is no longer reachable.
# ping 192.168.1.3
Add individual hosts to the routing table to allow
communication.
# route add –host 192.168.1.2 dev eth0
# route add –host 192.168.1.3 dev eth0
Verify these hosts are in the routing table.
# route
Use the ping
command to verify communication among the machines has been restored.
# ping 192.168.1.2
# ping 192.168.1.3
Notice the machines were reachable when either the network
or the individual host was in the routing table. Note also that the exercise manipulating the
routing table was unnecessary since the ifconfig
command places the network in the routing table for us.
EX.NO:2A Connect Internet in Linux Environment
AIM:
Connect Internet in Linux Environment
Configuring networks such as a Digital Subscriber Line (DSL)
or Asynchronous Digital Subscriber Line (ADSL) primarily used for accessing the
internet can be a hassle, especially when you aren't using the same operating
system as what the directions were originally written for. This article is a
starting point for configuring DSL using Ubuntu Linux.
Steps
1
Open Network Connections to set up network settings in
Ubuntu. Go to “System”,
“Preferences” and chose “Network Connections."
2
Under the “Wired” tab, click on
“Auto eth0” and select “Edit."
Click on “IPV4 Settings” tab. Chose the “Automatic (DHCP)” option if
your network has a DHCP server. The DHCP Server has automatically assigned the
IP address to your system. Click "Apply."
You also chose the “Manual” option
from the Method drop-down list and assign the IP address, netmask and gateway
manually. You'll also have to assign the DNS Server address. Click
"Apply."
4
Check the IP address settings. Go to “Applications” “Accessories” and
chose “Terminal."
5
Type the following command into
terminal: “sudo ifconfig” without
quotes.
6
Get your new addresses. The Ifconfig command will show the
inet address, broadcast address and mask address.
EX.NO:2B
Setting up a Print Server in Linux Environment
AIM
Setting up a Print
Server in Linux Environment
Setting
up a network printer in Fedora
starting the process
Figure 1
Figure 2
Figure 3).
EX.NO:3A
AIM
Installation
of Apache Web server and configuring for PHP support.
The installation procedure here
is based on CentOS 6.x workstation default installation. This distro
and installation lack many of the libraries you need so it requires more work
to get XAMPP running than on other distros like Ubuntu.
1. The
default installation of CentOS lacks some of the libraries that XAMPP needs to
run, including 32 bit compatibility libraries. To get them you su to root
then use this yum command
2. Download
and install the latest verions from the XAMPP – 1.8.1 as of this writing – from
the XAMPP download page.
3.
Unpack the tarball.
4.
Move the xampp package to /opt
5. XAMPP
was designed to run on 32 bit operating systems. The start up script will
prevent xampp from starting up if you are running on a 64 bit system which
isn’t necessary since you installed 32 bit compatibility libraries in step 1.
To get around this restriction, open /opt/lampp/lampp in an editor and comment
out the following lines.
7.
Open /opt/lampp/etc/etc/extra/httpd-xampp.conf
in an editor.
8. Replace
the “Deny from all” statement with “Require all grant” in the
<LocationMatch> stanza. You can also comment out the “Allow from…”
line if you don’t want to accept connections from any external system.
9.
Start up xampp
10. Open
http://localhost in a browser. You should a get a browser window with
the XAMPP for Linux startup screen:
11. At
this point most of the setup work for XAMPP is done. However, if you plan
to use phpyMyAdmin you’ll have to do a little further configuration to get it
to work properly.
12. XAMPP
does not create all the tables that phpmyadmin needs so you have to do this
with an SQL script that is enclosed with the package. To do this click on
the Import tab in the toobar at the top of the screen.
13. Click
on the Choose button in the File to import section. The
button in your version of phpMyAdmin might say Browse.
14. Choose
the create_tables.sql script in /opt/lampp/lampp/phpmyadmin/examples
directory.
15. Click
on the Go button in the Format of imported file to run the
script which will add all the tables you need to the phpmyadmin database.
16. Open
/opt/lampp/lampp/phpmyadmin/config.inc.php in your editor of choice.
17. If
you want the default language of phpMyAdmin to be English, add these two lines:
18. Change
the authentication type as follows:
19. Add
the following lines in the config.inc.php file.
20. To
set a root password for phpmyadmin click on the Users tab in the
XAMPP Control Panel toolbar.
21. Click
on the edit icon in the column to the right on the User
Overview table for the root account on localhost.
22. Click
on the Password radio button in the Change password section
of the Edit Privileges: User ‘root’@'localhost’ page.
23. Enter
the new password then re-type the password.
24. Click
on the Go button to save the new password.
25. Repeat
steps 21 – 24 for root account on linux.
26. Close
your browser then restart Apache and MySQL in the XAMPP Control Panel.
27. Open
phpMyAdmin in your browser. This time you’ll be take to a phpMyAdmin
login screen.
28. Login
as root using password you set in step 21.
If
everything went well you’ll go to the phpMyAdmin main screen and see
a green Exit icon under the phpMyAdmin frame on the left side of
the screen. You can now create other databases and tables with phpMyAdmin
EX.NO:3 B UPLOADINGWEB
PAGE IN APACHE
You
can upload files to an Apache Web
server in two different ways:
via a standalone File
Transfer Protocolapplication or a Web-based control panel. Standalone FTP applications
act as independent bridges connecting your computer and your Web server over an
Internet connection. Launch them like you would any other application in your
Windows programs directory. Web-based control panels provide a similar service,
except you access them through your Web browser
Step 1
Open your computer’s FTP application.
Certain versions of windows come bundled with an application called WS_FTP
designed for this purpose. If you don’t already have an FTP application, download
one. FileZilla is a free alternative to WS_FTP.
Step 2
Create a new connection in your FTP
application and log in to your Apache server. What’s involved in creating a new
connection varies depending on the FTP software you’re using. In FileZilla,
open the Site Manager tool and click “New Site.” Enter your website’s Web
address in the “Host” field. Enter your username and password. Click the
“Connect” button when you’re finished.
Step 3
Navigate to
the desired directory on your Apache server. In most FTP applications, your
screen will be divided into two primary windows: one on the left showing files
on your computer and another on the right showing files on your Web server. If you’re uploading files that you want to be visible to the public,
look for a directory with a name like “Web,” “Public” or “public_html” in the
window on the right side of your FTP application.
Step 4
Locate the files you would like to upload
from your computer to your Web server. Double-click them in the left window to
add them to your uploads queue. In FileZilla, the uploads queue is on the
bottom of your screen. Each double-clicked file will appear in the queue. When
the queue is empty again, your uploads are complete.
Step 1
Open your
Web browser and navigate to your Web server’s control panel. The Web address of
your control panel varies depending on your Web host. On Apache servers running cPanel, for example, your address will usually
be www.yoursite.com/cpanel. Contact your Web host for the location of your
control panel.
Step 2
Log in to your control panel and navigate
to your file upload area. How this area is labeled depends on your Web host.
Common labels include “FTP” and “Upload Files.” On servers running cPanel, the
file upload area is usually called “File Manager.”
Step 3
Navigate to the Web server folder where
you want to upload your files.
Step 4
Click the “Upload” button and select the
files on your computer you’d like to upload. In cPanel, you’ll need to click a
“Browse” button in File Manager to display files on your computer. Double-click
files to add them to your queue. They will begin uploading automatically.
PHP and MYSQL
EX.NO:4
AIM:
Create a web page and execute a PHP file on submission of
the HTML form and display
the information using PHP.
<html>
<html>
Output:
Welcome boopathi
5 a. Write a program to find the factorial of a
number and display.
<?php
function factorial($number) {
if ($number < 2) {
return 1;
} else {
return ($number * factorial($number-1));
}
}
Print factorial(5);
?>
b. Generate a PHP script that will display the grade
on the basis of marks as follows :
Distinction – 80 and
above
First Class – From 60
to below 80
Second Class – From
45 to below 60
Pass Class – From 35 to below 45
Fail – Below 35
Test the above program using the following set of values
stored in an array : 67,82, 23,
37, 57, and 97
Program
<?php
$mark = array(67,82, 23,37, 57, 97);
foreach ($mark as $value)
{
echo “Second Class:$value”;
}
elseif ($value>=35&&$value<45)
{
else
{
echo “fail:$value”;
}
}
Output:
First Class :67
select.php
<?php
foreach($_POST['game'] as $value)
{
echo 'Selected: ',$value ;
echo"<br>" ;
}
?>
select.html
7. Create a PHP code, which will retrieve the data captured
by the HTML form, display the
name of the form and also display the message “Data Entered
successfully” after
performing validations.
<!DOCTYPE HTML>
Echo “Data Entered successfully ”;
8. Write a program to redirect the browser.
<?php
<?php
9. Write a PHP script using function call.
<?php
Output:
10 Write a program in PHP to create a file and write the
data into it.
<?php
11 Create a database of an employee in MySql.
<?php
12 Write a program to connect to the database already
created inMySql.
<?php
$con =
mysql_connect("localhost","root","");
if (!$con)
{
die('Could not
connect: ' . mysql_error());
}
else
{
echo "ok data
base";
}
mysql_select_db("emp", $con);
$sql = "CREATE TABLE Per
(
FirstName varchar(15),
LastName varchar(15),
Age int
)";
echo "table create";
// Execute query
mysql_query($sql,$con);
mysql_close($con);
?>
13 Write a program to read, write, update and delete the
database using PHP..
Insert Data From a Form Into a Database
<html>
<?php
Display the Result in an HTML Table
<?php
Update Data In a Database
<?php
Delete Data In a Database
<?php
PYTHON
14 a. Take Fahrenheit temperatures from the command line,
and prints their Celsius
Equivalents
print ("Select conversion:")
print
("1. C to F")
print ("2. F
to C")
option =
input(">")
if option == 1:
celsius =
input("Enter temperature in Celsius: ")
fahrenheit =
celsius * 1.8 + 32
print
"The temperature in Fahrenheit is " + str(fahrenheit)
elif option == 2:
fahrenheit =
input("Enter temperature in Fahrenheit: ")
celsius =
(fahrenheit * 5 - 160) / 9
print
"The temperature in Celsius is " + str(celsius)
b. Use regular expressions to check whether a phone number
is valid
15 Write a python
program to display the content of all text files (txt) in a directory
# Write a file
with open("test.txt",
"wt") as
out_file:
out_file.write("This Text
is going to out file\nLook
at it and see!")
# Read a file
with open("test.txt",
"rt") as
in_file:
text = in_file.read()
print(text)
No comments:
Post a Comment